Spec-Zone .ru
спецификации, руководства, описания, API
|
|
Spec-Zone .ru
спецификации, руководства, описания, API
|
GroupLayout layout manager combined with a builder tool to lay out your GUI. One such builder tool is the
NetBeans IDE. Otherwise, if you want to code by hand and do not want to use GroupLayout, then GridBagLayout is recommended as the next most flexible and powerful layout manager.
If you are interested in using JavaFX to create your GUI, see Working With Layouts in JavaFX.
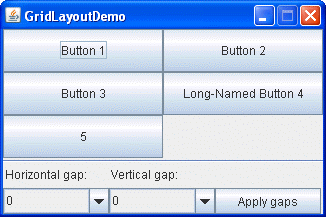
The following figure represents a snapshot of an application that uses the class.
Click the Launch button to run GridLayoutDemo using (). Alternatively, to compile and run the example yourself, consult the example index.
The complete code of this demo is in the
A GridLayout object places components in a grid of cells. Each component takes all the available space within its cell, and each cell is exactly the same size. If the GridLayoutDemo window is resized, the GridLayout object changes the cell size so that the cells are as large as possible, given the space available to the container.
The code snippet below creates the GridLayout object and the components it manages.
GridLayout experimentLayout = new GridLayout(0,2);

...

        compsToExperiment.setLayout(experimentLayout);

        compsToExperiment.add(new JButton("Button 1"));
        compsToExperiment.add(new JButton("Button 2"));
        compsToExperiment.add(new JButton("Button 3"));
        compsToExperiment.add(new JButton("Long-Named Button 4"));
        compsToExperiment.add(new JButton("5"));
The constructor of the GridLayout class creates an instance that has two columns and as many rows as necessary.
Use combo boxes to set up how much vertical or horizontal padding is put around the components. Then click the Apply gaps button. The following code snippet shows how your selection is processed by using the setVgap and setHgap methods of the GridLayout class:
applyButton.addActionListener(new ActionListener(){
            public void actionPerformed(ActionEvent e){
                //Get the horizontal gap value
                String horGap = (String)horGapComboBox.getSelectedItem();
                //Get the vertical gap value
                String verGap = (String)verGapComboBox.getSelectedItem();
                //Set up the horizontal gap value
                experimentLayout.setHgap(Integer.parseInt(horGap));
                //Set up the vertical gap value
                experimentLayout.setVgap(Integer.parseInt(verGap));
                //Set up the layout of the buttons
                experimentLayout.layoutContainer(compsToExperiment);
            }
        });
The following table lists constructors of the GridLayout class that specify the number of rows and columns.
| Constructor | Purpose |
|---|---|
GridLayout(int rows, int cols) |
Creates a grid layout with the specified number of rows and columns. All components in the layout are given equal size. One, but not both, of rows and cols can be zero, which means that any number of objects can be placed in a row or in a column. |
| Creates a grid layout with the specified number of rows and columns. In addition, the horizontal and vertical gaps are set to the specified values. Horizontal gaps are places between each of columns. Vertical gaps are placed between each of the rows. |
The GridLayout class has two constructors:
The following table lists code examples that use the GridLayout class and provides links to related sections.
| Example | Where Described | Notes |
|---|---|---|
GridLayoutDemo |
This page | Uses a 2-column grid. |
| How to Use Combo Boxes | One of many examples that use a 1x1 grid to make a component as large as possible. | |
LabelDemo |
How to Use Labels | Uses a 3-row grid. |
|
