Spec-Zone .ru
спецификации, руководства, описания, API
|
|
Spec-Zone .ru
спецификации, руководства, описания, API
|
The MySQL Cluster Auto-Installer is made up of two components. The front end is a GUI client implemented as a Web page that loads and runs in a standard Web browser such as Firefox or Microsoft Internet Explorer (see Section 17.2.1.1, "MySQL Cluster Auto-Installer Requirements"). The back end is a server process (ndb_setup.py) that runs on the local machine or on another host to which you have access.
These two components (client and server) communicate with each other using standard HTTP requests and responses. The back end can manage MySQL Cluster software programs on any host where the back end user has granted access. If the MySQL Cluster software is on a different host, the back end relies on SSH for access, using the Paramiko library for executing commands remotely (see Section 17.2.1.1, "MySQL Cluster Auto-Installer Requirements").
The remainder of this section is concerned primarily with the Web client. For more information about using the command-line tool, see Section 17.4.21, "ndb_setup.py — Start browser-based Auto-Installer for MySQL Cluster".
MySQL Cluster Auto-Installer Interface. This section describes the layout and navigation of the MySQL Cluster Auto-Installer, whose Welcome screen looks similar to what is shown here when it is first opened in the Web browser:
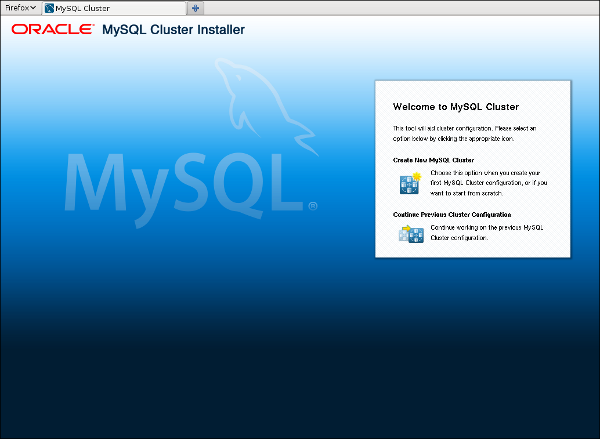
You can access the installer UI by selecting either of the options Create New MySQL Cluster or Continue Previous Cluster Configuration. A typical screen in the Auto-Installer includes the following elements:
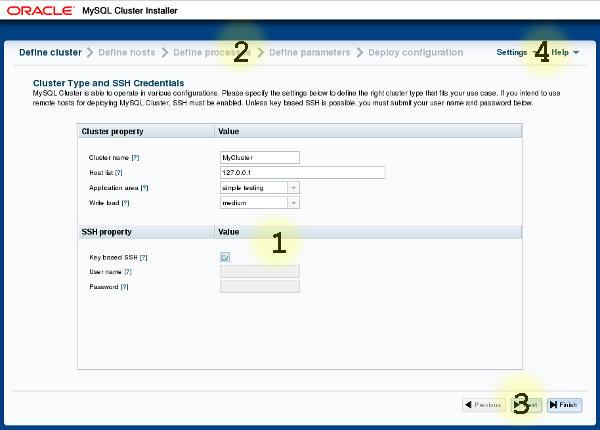
Display panel. The central area where data regarding configuration settings and controls for changing them are displayed.
Breadcrumb navigation. Located in the top left and top center of the GUI, the breadcrumb navigation bar consists of a series of titles linking to screens that correspond to steps in the configuration of a MySQL Cluster. The breadcrumb allows you to jump between these stages in arbritrary order.
Sequential navigation. This consists of a set of buttons labelled , , and , and can be found in the lower right-hand corner of the GUI. The sequential navigation is used to move between steps in the suggested order.
Settings and Help menus. These menus can be found in the top right corner of the GUI (to the right of the breadcrumb navigation bar). provides provides a way check and possibly alter configuration settings for the Auto-Installer; can be used to access the installer's built-in help files.
The locations of the elements just described are shown here in a typical page in the Auto-Installer; the numbers superimposed thereupon correspond to those used in the preceding list.
All of these elements except for the display panel are described in greater detail in the remainder of this section. Section 17.2.1.3, "Using the MySQL Cluster Auto-Installer", describes the panels shown in the display area as well as the functionality of each panel and the controls it contains.
Arbitrary and sequential navigation. The Auto-Installer can display any of a number of pages covering different stages in the setup and configuration of a MySQL Cluster deployment. You can navigate between pages in either of two ways. The first of these is the breadcrumb trail navigation toolbar displaying the titles of the various pages (in which the title of the current page is highlighted and disabled). From these, any desired page, in any desired order, can be reached by selecting the title of the corresponding page. This toolbar is shown here:

The second navigation mechanism provided by the Auto-Installer consists of the , , and sequential navigation buttons at the bottom right of the page. These can be used to move to the next or previous page in predetermined order, or to go to the very last page. The buttons are enabled and disabled as needed, so that you cannot, for example, advance beyond the last page.
Settings and Help menus. These menus are positioned adjacent to one another in the top right corner of the GUI, as shown earlier in this section. The menu is shown here in more detail:
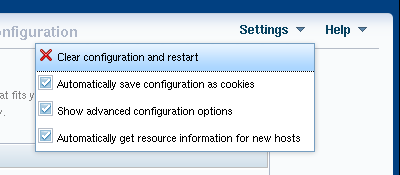
The entries in the menu are described here, in the following list:
: Remove all hosts and processes; reset all parameter values to their defaults; start the installer over at the first page.
: Save your configuration information—such as host names, process data, and parameter values—as a cookie in the browser. When this option is chosen, all information except any SSH password is saved. This means that you can quit and restart the browser, and continue working on the same configuration from where you left off at the end of the previous session).
Since the SSH password is never saved, you must supply this once again at the beginning of a new session, if one is used.
: Show advanced configuration parameters in the Auto-Installer and make these settable by the user.
You should note that, once set, the advanced parameters continue to be used in the configuration file until they are explicitly changed or reset. This is regardless of whether the advanced parameters are currently visible in the installer; in other words, disabling the menu item does not reset the values of any of these parameters.
: Query new hosts automatically for hardware resource information to pre-populate a number of configuration options and values. In this case, the suggested values are not mandatory, but they are used unless explicitly changed using the appropriate editing options in the installer.
As with the installer's navigation elements, one or more of the entries in the menu may be disabled due to choices you have made previously.
The menu is shown here, as it appears when expanded:
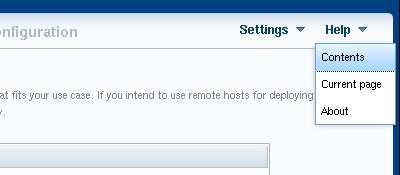
The menu provides several options, described in the following list:
: Show the built-in user guide. This is opened in a separate browser window, so that it can be used simultaneously with the installer without interrupting workflow.
: Open the built-in user guide to the section describing the page currently displayed in the installer.
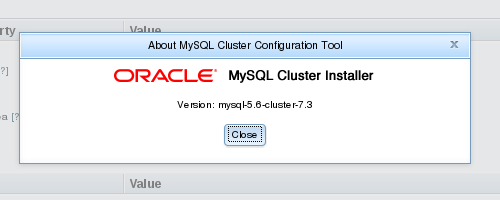
: This will show a small dialog displaying the installer name and the version number of the MySQL Cluster distribution it was supplied with, similar to what is shown here:
The Auto-Installer also provides context-sensitive help in the form of tooltips for most input widgets. One of these tooltips is displayed when the mouse hovers over a widget or the small question mark which can sometimes appear next to a widget label.
In addition, the names of MySQL Cluster configuration parameters are linked to their descriptions in the online MySQL Cluster documentation, so that if you click on the name of a given parameter, the documentation for that parameter is shown in a separate window.