Редактирование автоматических ограничений макета
Измените определение ограничения путем редактирования его значений в инспекторе Атрибутов.
Выберите ограничение в Интерфейсном Разработчике путем щелчка по имени ограничения в представлении схемы или путем щелчка по существенной синей строке, представляющей ограничение на холст.
Если представление схемы не появляется, выведите на экран его путем щелчка по управлению Схемой Документа Шоу (
 ) в нижнем левом углу холста. Выберите ограничение из списка вложенных элементов. В снимке экрана ниже, ограничение высоты выбрано для кнопки Archer.
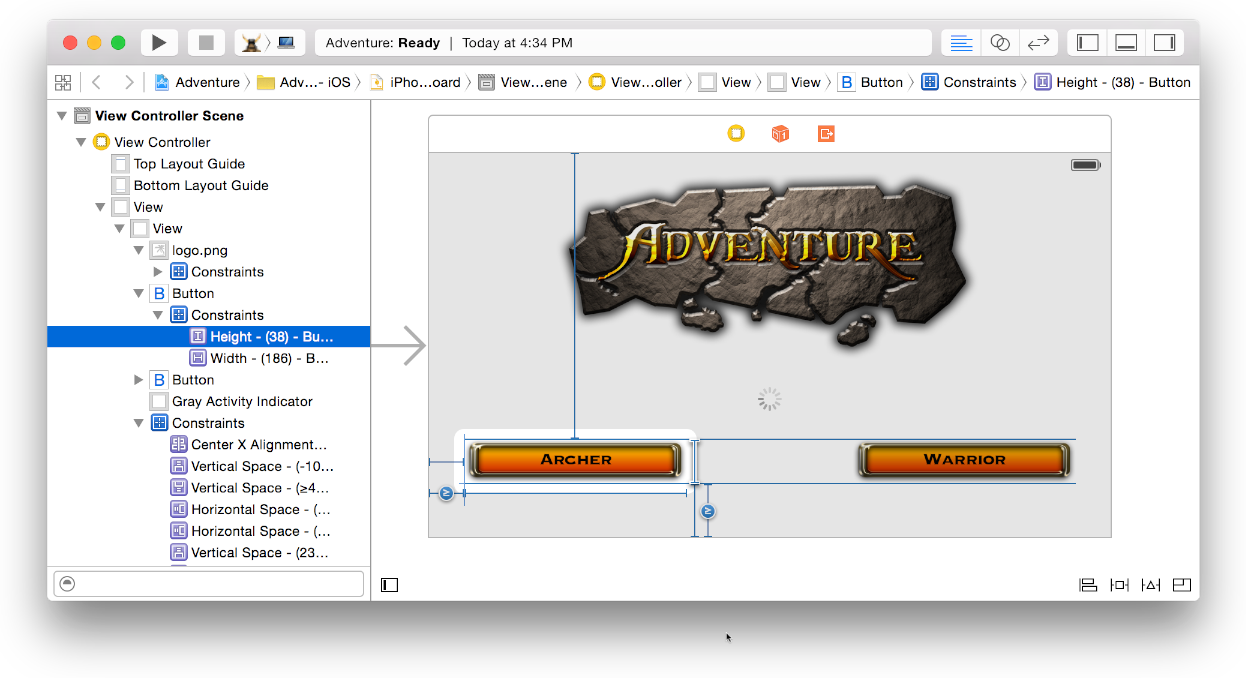
Для выбора многократных ограничений, в представлении схемы Щелкают при нажатой клавише Shift по диапазону ограничений или ограничений частного лица Щелчка команды. Например, можно выбрать атрибут ширины для всех изображений и установить их равный тому же значению.
Откройте область утилит для окна рабочей области путем щелчка по управлению Утилитами Шоу (
 ) на панели инструментов.
Нажмите кнопку Attributes Inspector (
 ) в панели инспектора.
Определение выбранного ограничения или ограничений появляется в инспекторе.
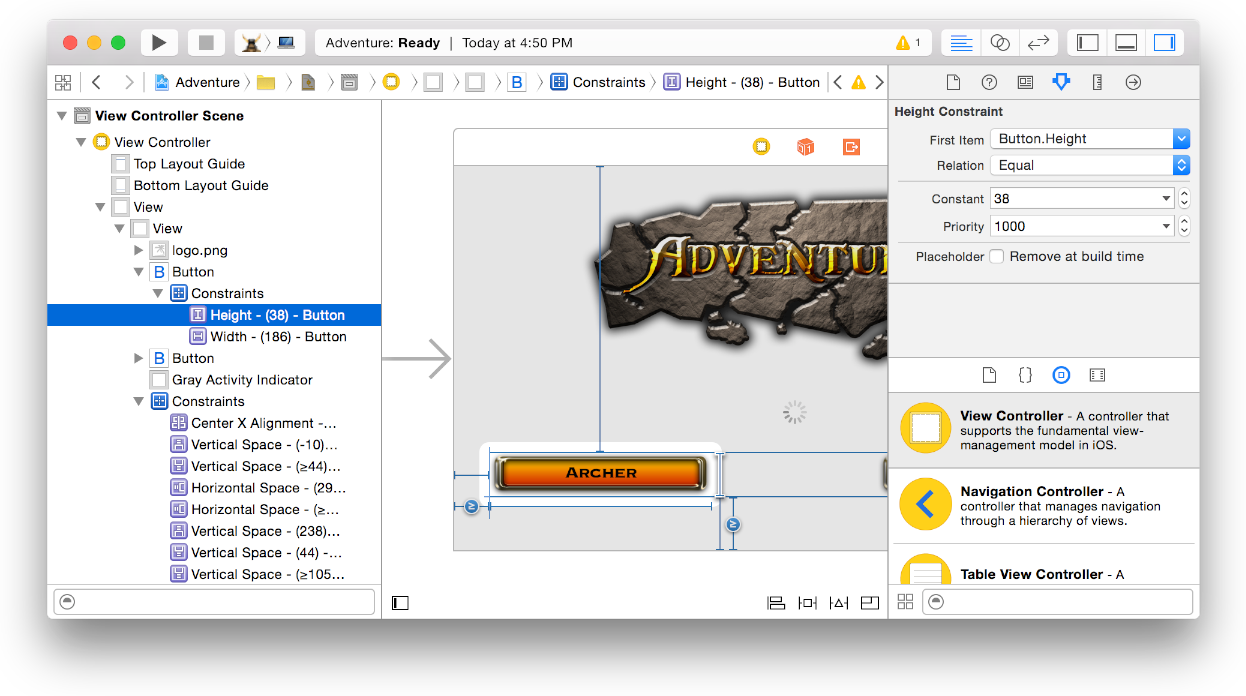
Инспектор представляет определение ограничения как математическое отношение. В снимке экрана выше, инспектор Атрибутов указывает что высота кнопок (
Button.Height) равно 38 точкам.Ограничение обычно применяется к двум элементам. Например, ограничение могло бы указать что нижняя часть суперпредставления (
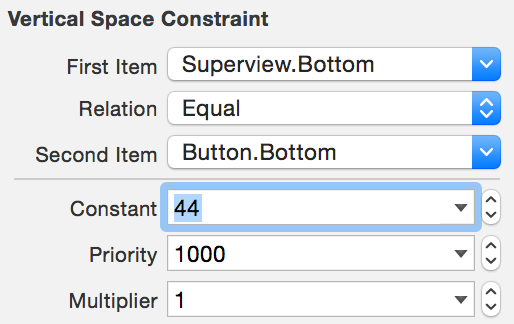
Superview.Bottom) должно быть больше, чем или равным 44 точкам от нижней части кнопки (Button.Bottom), как показано в следующем снимке экрана.
Выполните любую из следующих операций:
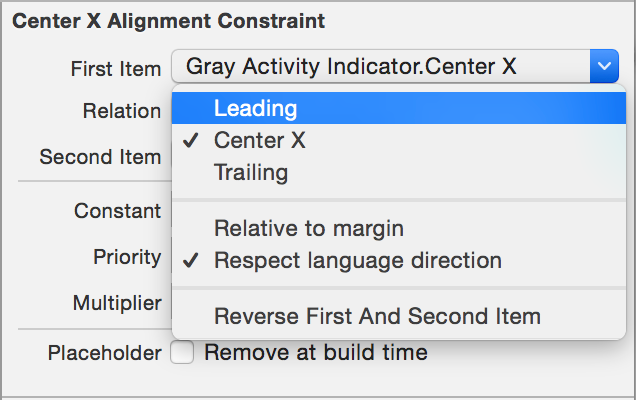
Чтобы изменить отношение, наложенное ограничением или изменить атрибут, идентифицированный в Первом Элементе или Втором всплывающем меню Элемента, используют соответствующее всплывающее меню. Следующий снимок экрана показывает два элемента, выбранные из Второго всплывающего меню Элемента. Считайте обсуждение ниже для подробных данных об интерпретации и изменении значений этих всплывающих меню.
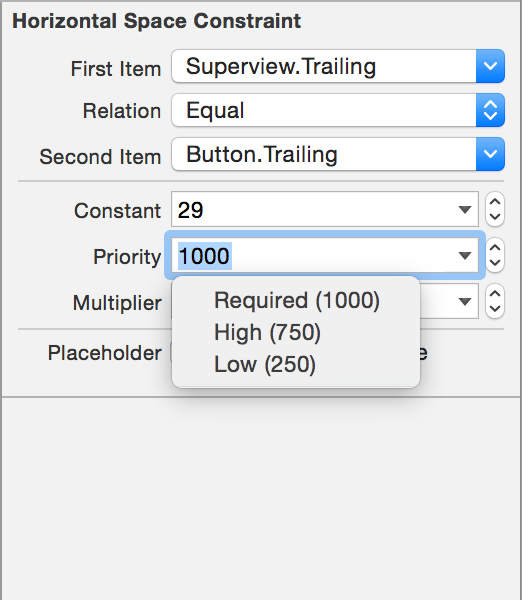
Для изменения значения Множителя, Постоянного, или поле Priority, используют его текстовое поле, всплывающее меню или управление степпером. Следующий снимок экрана показывает всплывающее меню для поля Priority. Считайте обсуждение ниже для подробных данных об интерпретации и изменении значений этих полей.
Для удаления ограничения во время изготовления установите флажок Placeholder. Некоторые контейнерные представления — такие как представления штабеля — зависят от размера их содержания для определения их размера во время выполнения. Поэтому размер неизвестен во время проектирования. Неопределенный размер содержания для элемента приводит к ограничительной неоднозначности. Для решения этой проблемы необходимо установить ограничение, такое как минимальная ширина для представления, как заполнитель проекта путем установки этого флажка.
Для удаления ограничения нажмите Delete.
Инспектор Атрибутов размечается для представления информации об ограничении в пути, отражающем линейное уравнение, такое как следующее для отношения равенства:
|
In this equation, the attribute of the first item is equal to the attribute of the second item, multiplied by a scaling factor, and offset by a constant number of points. Constraints can also use Greater Than or Equal (>=) or Less Than or Equal (<=) relations between attributes.
In addition, a priority value specifies the precedence that Auto Layout uses to satisfy a constraint compared to other constraints, where 1000 specifies a required constraint and any value less than 1000 specifies an optional constraint. The next screenshot presents a constraint that can be represented by the equation:
|
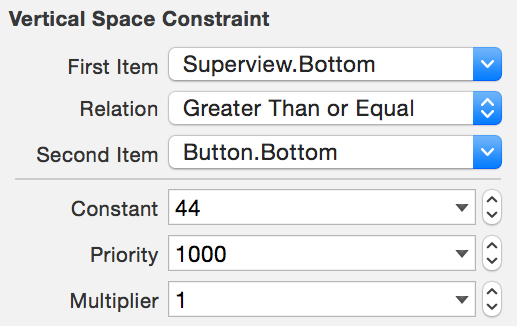
The priority of 1000 makes this a required constraint. In other words, the bottom of the superview is required to be greater than or equal to the bottom of a button, plus 44 points, thereby ensuring that the bottom of the superview is at least 44 points from the bottom of the button.
You can edit the constraint values displayed in the Attributes inspector as described in the rest of this article.
First Item and Second Item. The pop-up menus for these items allow you to edit their attributes. The title of each pop-up menu indicates an item to which the constraint applies, or if you’ve selected constraints for multiple items, the pop-up menu indicates the number of items with constraints. Each pop-up menu also identifies the attribute for that item, or if you’ve selected constraints with different attributes, the menu indicates the number of attributes.
For a single constraint, the title of the menu is a two-part string, with each part separated by a period (.). The first part of the string identifies the item. In the following screenshot, the First Item is the Superview.

The name used to identify the item in the constraint menu is the same as the one used in the outline view. Any customized names in the outline view are used in the title of the label. For example, in the figure below, each of the two items is a label, and the name in the outline view is the string contained in the label, “Expert” for the first item and “Novice” for the second.

Separated from the first part of the pop-up menu title by a period (.), the second part of the title identifies the attribute. Depending on the position or size of the item and its orientation, the inspector displays one of these groups of attributes (described in About Auto Layout and Layout Constraints):
Horizontal positioning: Leading, Trailing, Left, Right, and Center X
Vertical positioning: Top, Bottom, Center Y, and Baseline
Size: Width and Height
In addition, the second part of the title for a horizontal or vertical constraint can end with Margin. This means the constraint is to the margin of a container instead of the edge. See the discussion of Margins below.
To change the attribute for an item, choose an attribute from the item’s pop-up menu. In the following screenshot, the attribute Leading is chosen to replace the attribute Center X:

To change the horizontal positioning attributes Leading and Trailing to Left and Right for an item, use its pop-up menu to deselect “Respect language direction.” (However, generally use Leading and Trailing instead of Left and Right to make sure your interface is laid out appropriately in all languages.)

To change the horizontal positioning attributes back to Leading and Trailing, choose “Respect language direction” again. (If you select multiple constraints with Leading or Trailing and Left or Right attributes, the attributes are dimmed in the pop-up menu to reflect their mixed state.)
To see information about the methods related to an item, move the pointer over the item.

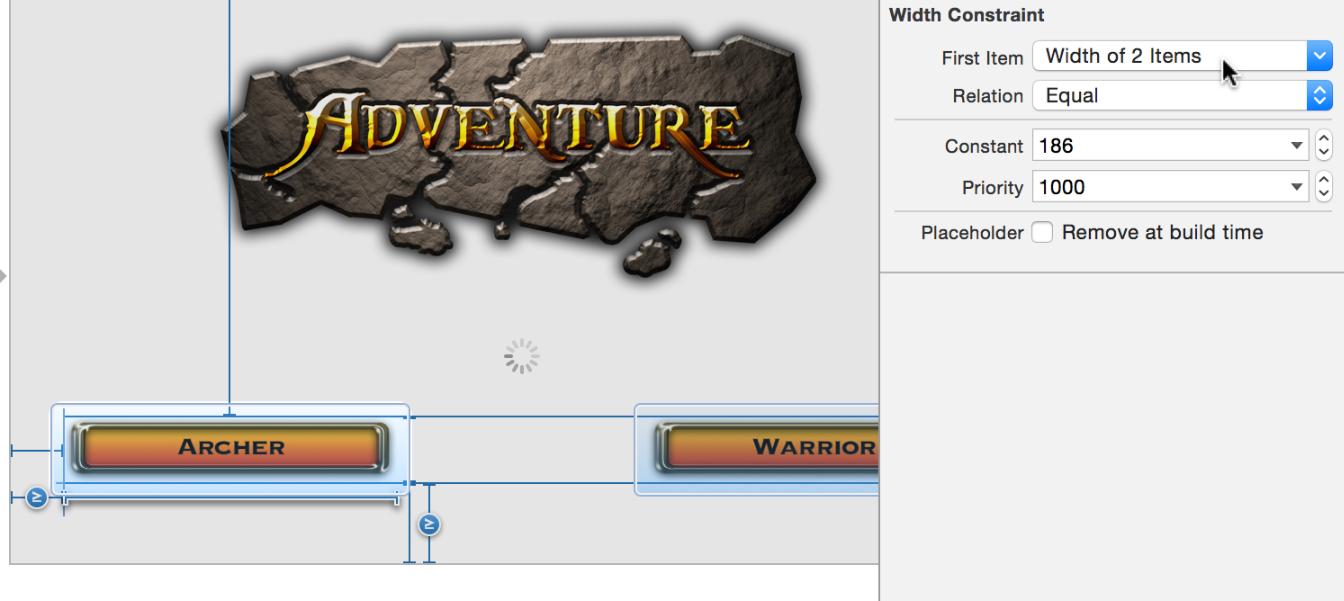
If you select more than one constraint with the same attribute, the inspector indicates the attribute and the number of items. In the following screenshot, the attribute Center X is applied to two items (an image view and a gray activity indicator) in the First Item pop-up menu:


To help you identify which items pertain to multiple selected constraints, move the pointer over the pop-up menu. The items, such as the buttons labeled Archer and Warrior in the screenshot below, become highlighted on the canvas.

If you select more than one constraint with different attributes for the same item, the inspector indicates the number of attributes and identifies the item. In the screenshot below, two constraints (for the attributes Height and Width) are selected for a button.


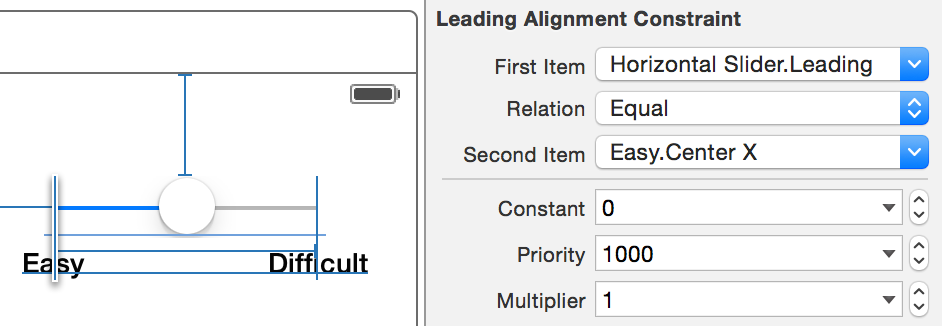
Because you can specify a different attribute in the pop-up menu for each item, you can create cross-attribute constraints. For example, you can specify that the leading edge of a slider aligns with (that is, is equal to) the center X position of a label, as shown below for the label Easy.
The items’ pop-up menus also allow you to reverse the two items. When you choose Reverse First and Second Item, Auto Layout reverses the constraint in a mathematically equivalent way. For example, if a label is constrained to be half the height of an image view and you reverse the items, the image view becomes constrained to be twice the height of the label.
Margin. Horizontal and vertical constraints to a container view can be to the margin or to the edge. Margins correspond to the values in the layoutMargins atttribute of UIView and specify recommended minimal distances between an edge of a container view and the corresponding edge of a child. For more information, see the API documentation for layoutMargins.
To toggle using the margins in constraint pop-up menus, hold down the Option key. Depending on the constraints, this might do two things:
Toggle constraints from using the margin of the container to using the edge.
Toggle constraints that are not using the margin of the container to using the margin.
Relation. The title of the pop-up menu identifies the relation imposed by the constraint. You can set the relation to one of three values: Equal, Less Than or Equal, or Greater Than or Equal. If you choose multiple constraints with different relations, the pop-up menu title reads Multiple Values and the menu title is dimmed to reflect the mixed state.
Multiplier. Auto Layout calculates the first item’s attribute to be the product of the second item’s attribute and this multiplier. Any value other than 1 creates a proportional constraint. For a Width attribute, for example, the width of the first item can be set to be twice the width of the second item, as illustrated in the following screenshot. The multiplier can be a decimal number (2.0), a percentage (200%), a fraction (2/1), or a ratio (2:1).

For an aspect ratio constraint, the multiplier is the ratio of width to height. For a single item’s constraint, for example, if the multiplier is 1:2, the item’s width is constrained to be half its height. For two items, the multiplier is the ratio of the width of the first item to the height of the second item. If the multiplier is 1:2, for example, the width of the first item is constrained to be half the height of the second item.
When you click the stepper to increment or decrement the multiplier, its value changes in increments of 0.1 for decimal numbers (for example, from 2.0 to 2.1), 1% for percentages (for example, from 50% to 51%), and 1 for the numerator of fractions and ratios (for example, from 1/5 to 2/5 and from 1:5 to 2:5).
To reverse the multiplier, choose Reverse Multiplier from the pop-up menu for the Multiplier field. For example, the fraction 1/2 becomes 2/1; the ratio 1:2 becomes 2:1; the decimal value 0.5 becomes 2; and 50% becomes 200%.
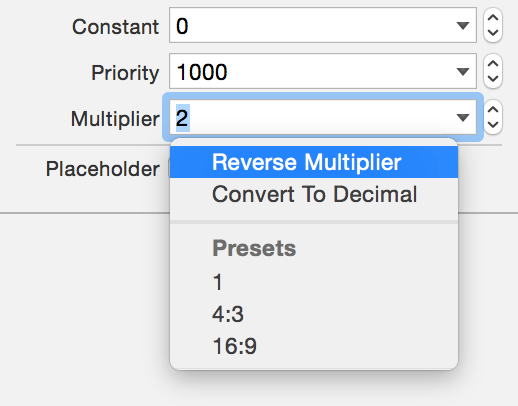
To change a nondecimal multiplier value to a decimal value, choose Convert To Decimal from the pop-up menu. For example, the fraction 1/2 is converted to 0.5.
You can also choose from three preset ratios in the menu. These presets offer a quick way to choose a ratio to work from, but the menu isn’t meant to imply that these are standard or recommended system values.
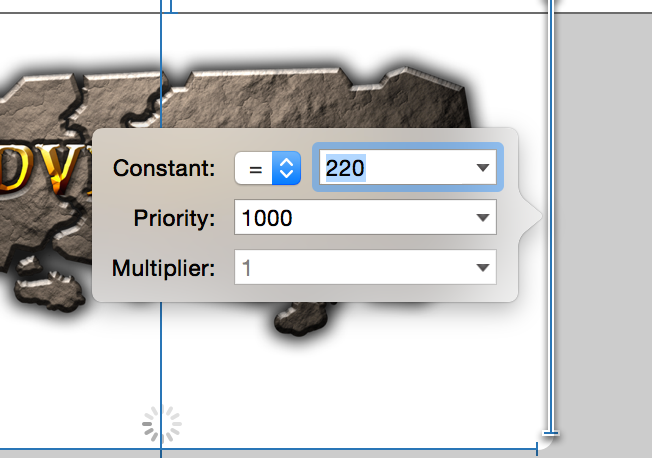
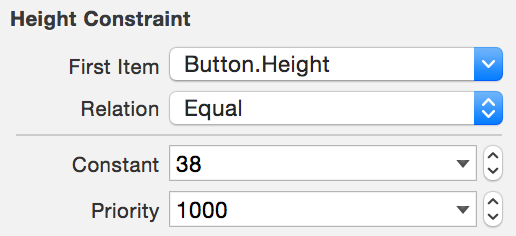
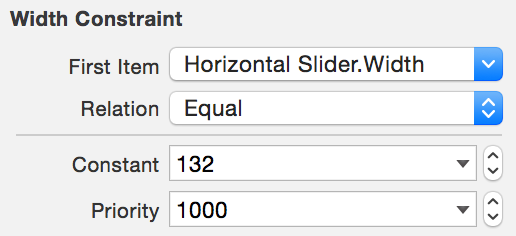
Constant. This value defines the physical size or offset, in points, of the constraint. For example, you can use this field to define:
The height of a button to be equal to 38 points:
The width for a label to be equal to 68 points:
The vertical space between the bottom of a superview and the bottom of a button to be greater than or equal to 44 points:
To use the recommended spacing for constraints that specify distance between items, choose Use Standard Value from the pop-up menu for the Constant field. After you choose Use Standard Value, Use Canvas Value is dimmed in the menu unless you manually change the distance between items on the canvas.
Priority. New constraints are created with a default priority of 1000, which makes them required. Generally, you won’t need to change the default priority. However, if you find constraints interacting in some unintended way (for example, one item moves and causes another item to be clipped), try giving a lower priority to a less critical constraint to resolve the problem.
To change the priority, enter an integer value between 1 and 1000 in the text field. To quickly set the priority to Required (1000), High (750), or Low (250), choose one of these values from the pop-up menu. Use the stepper control to the right of the text field to increment or decrement the value. For any constraint with a priority less than 1000, Auto Layout gets as close as it can to satisfying a constraint, even if it cannot completely achieve it.
For items with content that can become clipped, the pop-up menu includes a command to prevent clipping. For example, an image constrained by a width of 375 may appear fine in landscape orientation but become clipped by other nearby items in portrait orientation. When you choose Prevent item-name From Clipping, Auto Layout calculates and supplies a priority high enough to prevent the item from being clipped.

Copyright © 2015 Apple Inc. All Rights Reserved. Условия использования | Политика конфиденциальности | Updated: 2015-01-12
